Light and the egg
15/06/08 22:02 Filed in: Basics
The Egg Syndrome
One of the most basic photos a photographer can try is the egg shot. Set as an assignment in some photo courses, it's meant to be an introduction to the way that light strikes surfaces.
 It's surprisingly effective at demonstrating texture and shape. Shoot an egg the lazy way, straight on with a flash mounted on the camera and you'll get a featureless oval, the outline of an egg with none of the curious interest that the genesis of chickens can offer when you hold it up to the light.
Most eggs have some colour, ranging from a creamy off-white to a rich milky brown, an intriguing pebbled texture and a very distinctive shape.
I set this assignment for some young photographers that I coach occasionally and the results were, shall we say, interesting. After some griping about the apparently annoying simplicity of the assignment, I saw images that reflected some wrestling with the subject (it's difficult to get an egg to stand up) and lighting for the sake of putting the light source in odd places.
I always try to eat the dog food I set out for others, so the images accompanying this entry are my own take, in a demonstration session, on working an egg with a single light source.
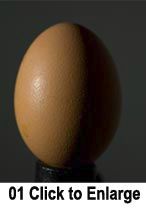
In the first photo, we start with the egg lit by a single source of light (Canon 580EX) from a 90 degree angle (counting clockwise from the camera position). This is a bit of cutting to the chase, to get right down to the business of delineating shape and texture, though what we actually get is half the shape and a whole lot of texture.
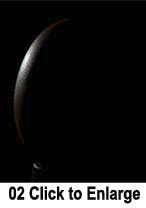 Fielding a request from the floor, I move the strobe to roughly 135 degrees, which gives a cool rim light to the egg. The cool "new moon" or "Alien" effect, depending on your tastes, reduces the light to a bright highlight, the result of the extreme incident angle between the light and the camera and particularly rich texture where the highlight falls off.
It's worth noting at this point that the egg is surrounded by darkness because there is no other light source on it. It's time to fix that.
In photo 3, the angle of the light is reduced to around 110 degrees, to strike a midpoint between the extreme fringe light of photo 2 and the above average, but improveable 90 degree angle of photo 1.
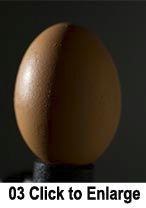 There is also a white reflector (a sheet of white foamcore) introduced to the image at roughly 270 degrees, angled slightly in toward the egg and just outside the range of the lens field of view. This puts a soft light glow on the right side of the egg, rounding out the shape and giving us just a hint of balance to the image.
In the final image, a light modifying device is added to the flash, a Lumiquest Big Bounce diffuser which changes the source of light from a single point source into a broader source of light that tosses illumination all around the room.
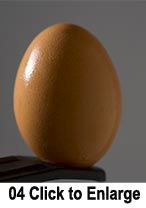 As the light becomes less intense on the illuminated side of egg, the returned light on the right hand side of egg from the reflector board becomes just a bit brighter in relation to it. You can usually figure out the size of a lightsource from the reflection it leaves on a reflective surface.
The scattered light source is now broad enough to scatter light onto the background, raising it from perceived black to a shade of gray. The wall is actually white, but doesn't receive enough light to register above the tone you see.
Note: The clamp that's holding the egg in place is different in the final frame, after the original egg fell and broke between photos 3 and 4.
One of the most basic photos a photographer can try is the egg shot. Set as an assignment in some photo courses, it's meant to be an introduction to the way that light strikes surfaces.
Most eggs have some colour, ranging from a creamy off-white to a rich milky brown, an intriguing pebbled texture and a very distinctive shape.
I set this assignment for some young photographers that I coach occasionally and the results were, shall we say, interesting. After some griping about the apparently annoying simplicity of the assignment, I saw images that reflected some wrestling with the subject (it's difficult to get an egg to stand up) and lighting for the sake of putting the light source in odd places.
I always try to eat the dog food I set out for others, so the images accompanying this entry are my own take, in a demonstration session, on working an egg with a single light source.
In the first photo, we start with the egg lit by a single source of light (Canon 580EX) from a 90 degree angle (counting clockwise from the camera position). This is a bit of cutting to the chase, to get right down to the business of delineating shape and texture, though what we actually get is half the shape and a whole lot of texture.
It's worth noting at this point that the egg is surrounded by darkness because there is no other light source on it. It's time to fix that.
In photo 3, the angle of the light is reduced to around 110 degrees, to strike a midpoint between the extreme fringe light of photo 2 and the above average, but improveable 90 degree angle of photo 1.
In the final image, a light modifying device is added to the flash, a Lumiquest Big Bounce diffuser which changes the source of light from a single point source into a broader source of light that tosses illumination all around the room.
The scattered light source is now broad enough to scatter light onto the background, raising it from perceived black to a shade of gray. The wall is actually white, but doesn't receive enough light to register above the tone you see.
Note: The clamp that's holding the egg in place is different in the final frame, after the original egg fell and broke between photos 3 and 4.
blog comments powered by Disqus